Hopefully, everyone here is healthy. Sometimes, though, we all need a little help.
If you missed the last post, check it out. "Thieves" needs to be in everyone's health
kit. Another oil that I would consider 'essential' is DiGize.
For a digestive aid, this is THE oil. It contains fennel, ginger, peppermint, juniper,
tarragon, lemongrass, anise, and patchouli. It smells wonderful!
A couple of testimonies to this unbelievable oil:
A friend who is a wealth of knowledge in natural health and essential oils had
a picture of her son on Facebook holding a bottle of Di-Gize. He had been
sick at 8:00 and she said with colloidal silver and Di-Gize, he was better and
asking to eat 2 hours later. A couple of days after that, one of my girls was
sick. We had not had sickness visit us in over a year. She was really a sick
girlie. I remembered my friend's Facebook post. I made a quick call to a
friend who lives about 2 minutes from us, knowing she also had some oil.
She generously shared some. I applied one (one!) drop of Di-Gize mixed
with one drop of olive oil and rubbed on the sick tummy. I also placed one
drop of 'Thieves' on the bottom of everyone's feet. We didn't want anyone
else getting sick. Within an hour, my child's nausea was gone and she was
no longer sick. Another hour, and it was bedtime, and I was a little nervous
not knowing what the night would bring. She wanted to sleep in her bed so
I pulled up a chair and ottoman just outside her room expecting to be up often
during the night. Nope, she slept well, awoke much better, and was eating
lightly later that day. This wasn't a random little thing; she had been sick for
hours before I remembered about Di-Gize and one drop brought relief. A couple
of nights ago, another daughter said her stomach felt "wonky". She asked me
to rub a drop on her--fifteen minutes later she reported her stomach felt great
and never had another complaint! I'm sold. And Di-Gize just became part
of our lives!
Wednesday, January 29, 2014
Monday, January 27, 2014
Using Essential Oils for Health
Hello! Time to start another week. Mondays at our house are made up of school (first and foremost), laundry, mopping hard floors, and baking. Today Hope has made granola for the week and Anna is making peanut butter cookies that will only last a few hours. It is a blessing to hear
my girls laughing in the kitchen together as I write.
In our quest for natural health we have discovered the benefits of essential oils. It has been very
helpful to learn more about these wonderful oils created by God for our good.
I'm going to be writing about 3 of them this week and today I wanted to start with the one
we use the most. I hope this information will be helpful to you because I love sharing what
I have learned with others. Let me start by saying that, again, I know essential oils were
created by The Creator for our benefit. They are "essential" to me for my family's good.
But they are JUST TOOLS that are available to me. I know our well being and health are
gifts from God and that's where the glory belongs, BUT, they are useful tools as He leads
us to know more about those things created and meant to be good to us and for us.
That said, here's what I want to share today. (And I get no compensation from Young
Living or Miracle 2--just want to share good information).
Thieve Essential Oil--it has to be my favorite. It smells wonderful. But better than that,
here is the scoop on it.
The name 'Thieves' comes from research about four thieves in France who covered
themselves in cloves, rosemary, and other spices when they would go into homes and
rob--homes where victims of the plague had died. It is a blend of clove, cinnamon,
rosemary, lemon, and eucalyptus. We take a drop in water and if my family doesn't
want to drink it, we apply it topically. It is good for strep (rubbed on the throat), flu,
colds, coughs (rubbed on the chest), and general immune building and good health. It
is probably better to combine with a drop of olive oil or coconut oil as the cloves and
cinnamon could irritate sensitive skin rubbed directly on. My girls will often just
breathe it if congested or feeling "blah", like something is coming on. I heard last
year during flu season an administrator at a nursing home bought three diffusers and
diffused Thieves throughout the building. They had only one case of flu and that case
was brought in when a patient was admitted with flu. And that case was short lived.
I also use it in cleaning. I combine water, Thieves, and Miracle 2 soap (see this website
www.missdaisyshealth.com to check out Miracle 2--we use it for cleaning and the
moisturizing soap for bathing) in a spray bottle for disinfecting everything! I also
made some hand wipes for the girls to use at ballet. I cut paper towels in half, put
them in a Ziploc bag, added boiled water (cooled) and a few drops of Thieves. Great
smelling wipes! And when we travel, I make up some to use on hard surfaces. Last
year when we went to basketball Nationals for a week, I diffused it in our hotel room.
Not a sniffle or germ got us!
Okay, enough about Thieves for today. I hope this is useful information. If you live
in the NW Arkansas area, I plan to host a class for essential oils soon. Let me know
if you are interested. Next post, I will tell you about the essential oil that stopped a
stomach virus in it's tracks, literally. And no one else in this close household has
come down with it. Thanks for reading this. Ask me anything about oils and I'll find
the answer for you. They are the real deals! Enjoy your Monday.
Labels:
decorating,
essential oils,
staying healthy
Friday, January 24, 2014
Valentine Banner
Happy Friday--the weekend is almost here!
A good way to stay busy while it is cold is to do some crafting. We have been staying
in a lot lately so by the end of the day, we are done with our work and ready to do
something fun.
We have a valentine craft on this blog from last January. www.patscollectibles.blogspot.com/2013/01/valentine-craft-fun-and-vintage.html This year, we have another Valentine craft that can add to your décor.
I made the fabric flowers on the left--the tutorial for making them is herewww.patscollectibles.blogspot.com/2014/01/fun-fabric-flowers_6.html. I used 6 burlap squares
for the letters--this was the hardest part; getting them even and trimming the edges.
I decided to use paint and a roller. I dropped the idea of the roller pretty quickly as I found it was just as easy to use a craft paint brush. It seemed easier to control the brush.
Using fabric glue and bias tape, I glued on the flower, then spaced the letters leaving a gap between
"Be" and "Mine" (obviously) and I placed some smaller rolled flowers there.
I glued the last flower on and tied knots on the ends to secure and make a loop for hanging. The loop
isn't this long, I just snapped the photo before tying the knot.
The smaller rolled flowers to separate and define.
A good way to stay busy while it is cold is to do some crafting. We have been staying
in a lot lately so by the end of the day, we are done with our work and ready to do
something fun.
We have a valentine craft on this blog from last January. www.patscollectibles.blogspot.com/2013/01/valentine-craft-fun-and-vintage.html This year, we have another Valentine craft that can add to your décor.
I made the fabric flowers on the left--the tutorial for making them is herewww.patscollectibles.blogspot.com/2014/01/fun-fabric-flowers_6.html. I used 6 burlap squares
for the letters--this was the hardest part; getting them even and trimming the edges.
"Be" and "Mine" (obviously) and I placed some smaller rolled flowers there.
isn't this long, I just snapped the photo before tying the knot.
And...she's finished. I like the look and I hope you do, too. Have a great weekend and we'll visit
next week. Stay warm!!
Labels:
crafts,
decorating,
Holidays
Wednesday, January 22, 2014
Some Valentine Decor
Happy Wednesday!
Valentine's Day is approaching and it's hard to believe. Didn't we just take down Christmas?
Time passes too fast...
Anyway, here are some decorative things you might enjoy. I included the prices, in case
you are interested. If so, you can always leave me a comment and I'll get back to you.
I think on Friday I'll post a repeat tutorial on a cute, vintage Valentine garland.
This is a fun piece because it has a burlap flower and buttons. You could use it all the time and if
you add red, you've got instant Valentine décor. $11.25
A fun felt runner $12.50 and sign $11.25
Canister $18.75
Another different but cute spin on Valentine's Day $7.50
Have a great Wednesday. Stay warm!
Labels:
Decor from our store,
Holidays
Monday, January 20, 2014
Hob Nail and Toile
Hello! And Happy Monday!
Two of the things that make me happy and I enjoy looking at and using are Hob Nail
accessories and anything toile. They obviously have no connection but I was just thinking
about both of them today and wanted to share some pictures with you, in case anyone
else enjoys them.
I researched Hob Nail and found out that it was popular in Victorian times and was made
by either blowing a glass vessel into a mold or by pressing the glass into a mold. Fenton
Art Glass first introduced their hob nail glass in 1939 and their milk glass hob nail in 1950.
It was one of their most successful products and supposedly kept the company going when
other glass makers were closing their doors.
This milk glass set was from my grandmother. I remember it displayed in built in shelves in her kitchen. When I spent the night with her, she would make orange juice at breakfast and serve it from
the pitcher into the cups. Good memories!
This dessert plate was hers, also. I have a set of them and enjoy using them.
Toile first came into the English language in the 12th century. It comes from a French word meaning
"cloth" or a "canvas" to be painted on. Although the patterns are very old, it saw a huge resurgence
around the year 2000. Mainly used for decorating, I read that designers are experimenting with it
in apparel. It was hugely popular in colonial times.
It's obvious I have a tendency to overdo toile in my house. And when I have grandchildren, I'm sure it will be here in pastels.
I hope you enjoyed the little diversion into decorating. Do you have hob nail or toile? Let me know how you use it.
We'll visit again, soon.
Labels:
decorating,
family
Friday, January 17, 2014
Don't You Just Love Quilts?
Happy Friday!
This has been a busy week but a good week. I hope yours has been good, too.
Quilts fascinate me. I love to look at them. I love to think about the hands that
made them. I like to wonder about the lady whose hands sewed the pieces and
quilted the finished product. I especially love old quilts.
Of course you know that quilts in America date back to the colonial times. They
weren't the showpieces of late. Life was hard and practical and so was homemaking.
Quilts were used on beds to keep a family warm and on doors and windows to keep
out the cold. They had a function.
Between 1750 and 1850, quilts were pieced and patched and became more elaborate,
with many still preserved for us today. Some were so elaborate that they were years
in the making and quilting.
It was customary in the 1800s for a young woman to make 13 quilt tops before she
married. Twelve were to use in her homemaking and a special large one was for her bed.
Also, "heirloom" quilts were made by mothers to save for their children to use when
they began to make homes of their own. We are priviledged to have several quilts and
coverlets made by my husband's grandmothers, both of whom were born in the 1890s.
This "Dutch Doll" quilt belongs to our youngest daughter. It was blocked by her great-grandmother
in 1930 (84 years ago!) and quilted in 2004 by a quilting guild in our area. It looks like it was done
yesterday. We love to look at the different fabrics and wonder what they originally were. Was it
her dress...his shirt...her apron? We'll never know, but we like to wonder. What a treasure!
Do you have special quilts? I'd love to hear about them.
Have a wonderful weekend and we'll visit next week.
Labels:
A simple life,
family,
homemaking
Tuesday, January 14, 2014
Decisions, decisions...
I like change...and sometimes I am resistant to change. I'm complex when it comes to decorating. I "tweak" sometimes to give something a new look. But when I really like something I tend to leave it. And so the story of my bedroom. Except for a few very small things, I have had the same look for 6 years. Now I am trying to decide on a new color to paint....but since I am happy with the room, it will not change much, just going to refresh the walls. Bored yet? I thought so. Anyway, here is the room as it is right now.
One thing I think will change is to replace the picture and hang a set of white ironstone plates in varying shapes. I love white matelassé. You can use it all the time as your basic and then change the
accessorie pieces...if you change, that is (unlike me) but at least it gives you the option.
Another change will be to paint the monster bird cage white.
Oh dear, those tuplips need to be dusted :).
And...the decision I can't seem to make. But I'm leaning toward the square one on bottom. I'll let you know.
Labels:
decorating,
homemaking
Friday, January 10, 2014
It's What's For Friday Dinner or Supper or Anything You Want It to Be
It's Friday! After starting the work week with 0 degrees and snow, we ended today with rain and thunder. I actually felt hot during the night. Not use to cold (as opposed to frigid), I guess.
Dinner ( or supper) tonight is going to be simple because I have to help with registration for the spring performance this afternoon at the ballet studio. Poor sentence structure--the performance is not this afternoon, just registration. :).
Anyway, I wanted to share a super-easy but still really tasty way to make your family happy--and a little healthy.
Our second favorite salad is easy. I'll share our favorite salad soon--it's not so easy. For this one, I use one half of a head of romaine lettuce. You could also use green or red leaf and I suppose iceberg but I wouldn't recommend that unless you want no nutritional value for your trouble. So, go with romaine or leaf. Also, you need a clove of garlic, salt and pepper to taste (a little heavier on the pepper), olive oil, and apple cider vinegar (unfiltered is the healthiest). Use a 2:1 amount of oil to vinegar. I would give you an exact amount but individual tastes vary; so will your amount. 2Tbs to 1 Tbs is probably a good start. Also, throw in a few green olives and a little juice and you're in love with it. You can also kick up the garlic in the winter or if anything is "going around".
Now for more good and easy. Frozen ravioli made from cheese is our favorite. Beef ravioli would work, I'm sure--it's just not our thing. Take a package of ravioli and place in a greased pan. Sprinkle 6 oz of mozzarella cheese on top of that and a jar of your favorite spaghetti sauce on top of all that. We love Ragu or Bertolli. Place in 375 degree oven for about 45 minutes. You can also put some parmesan cheese on top it you like. Add some garlic bread and you are all set.
What's cooking at your house tonight?
Have a great weekend--we'll visit next week.
Dinner ( or supper) tonight is going to be simple because I have to help with registration for the spring performance this afternoon at the ballet studio. Poor sentence structure--the performance is not this afternoon, just registration. :).
Anyway, I wanted to share a super-easy but still really tasty way to make your family happy--and a little healthy.
Now for more good and easy. Frozen ravioli made from cheese is our favorite. Beef ravioli would work, I'm sure--it's just not our thing. Take a package of ravioli and place in a greased pan. Sprinkle 6 oz of mozzarella cheese on top of that and a jar of your favorite spaghetti sauce on top of all that. We love Ragu or Bertolli. Place in 375 degree oven for about 45 minutes. You can also put some parmesan cheese on top it you like. Add some garlic bread and you are all set.
What's cooking at your house tonight?
Have a great weekend--we'll visit next week.
Labels:
family/baking,
staying healthy
Wednesday, January 8, 2014
Easy Project
Our week is half over and I hope it's been a good one for you.
Today our high was in the 30s, quite a warm up from Monday and Tuesday when it struggled to get above 0.
These cold, winter days that find us staying inside are great days for projects. Big projects give us a good feeling of accomplishment but sometimes a quick, easy project can be rewarding without the time and energy spent on something bigger.
I love monograms and initials so one day I adapted a little something for the master bathroom based on an idea I had seen on a blog.
I had an empty decorative frame and some scrapbook paper that I really liked. I also had some plain cardstock in a khaki color. They were all perfect since the bathroom is black and khaki.
I found a font on the computer--I believe it was Edwardian Script. I am particularly fond of cursive type scripts so this was perfect. I had to play around with the size but finally found one that fit the
frame. I placed our last name in the middle and our first initials on each side of the name. Again, I had to play with the spacing. After printing that off, I cut the scrapbook paper with decorative scissors, making a frame for the monograms. I slipped all that in the frame and was done. The hardest part was sizing and spacing the writing and that wasn't really that hard. The finished product:
If you decide to do anything like this, send pictures of your project.
We'll visit later in the week-- stay warm.
Labels:
decorating,
projects
Monday, January 6, 2014
Fun Fabric Flowers
Happy Monday to you!
Last week I promised you a tutorial on how to make fabric flowers. Lots of pictures, but if you are
like me, I need step by step directions. You probably could do it without my micro managing
steps but I didn't want to leave anything out and wanted to try to make it easy for you.
This wreath has fabric flowers that we made.
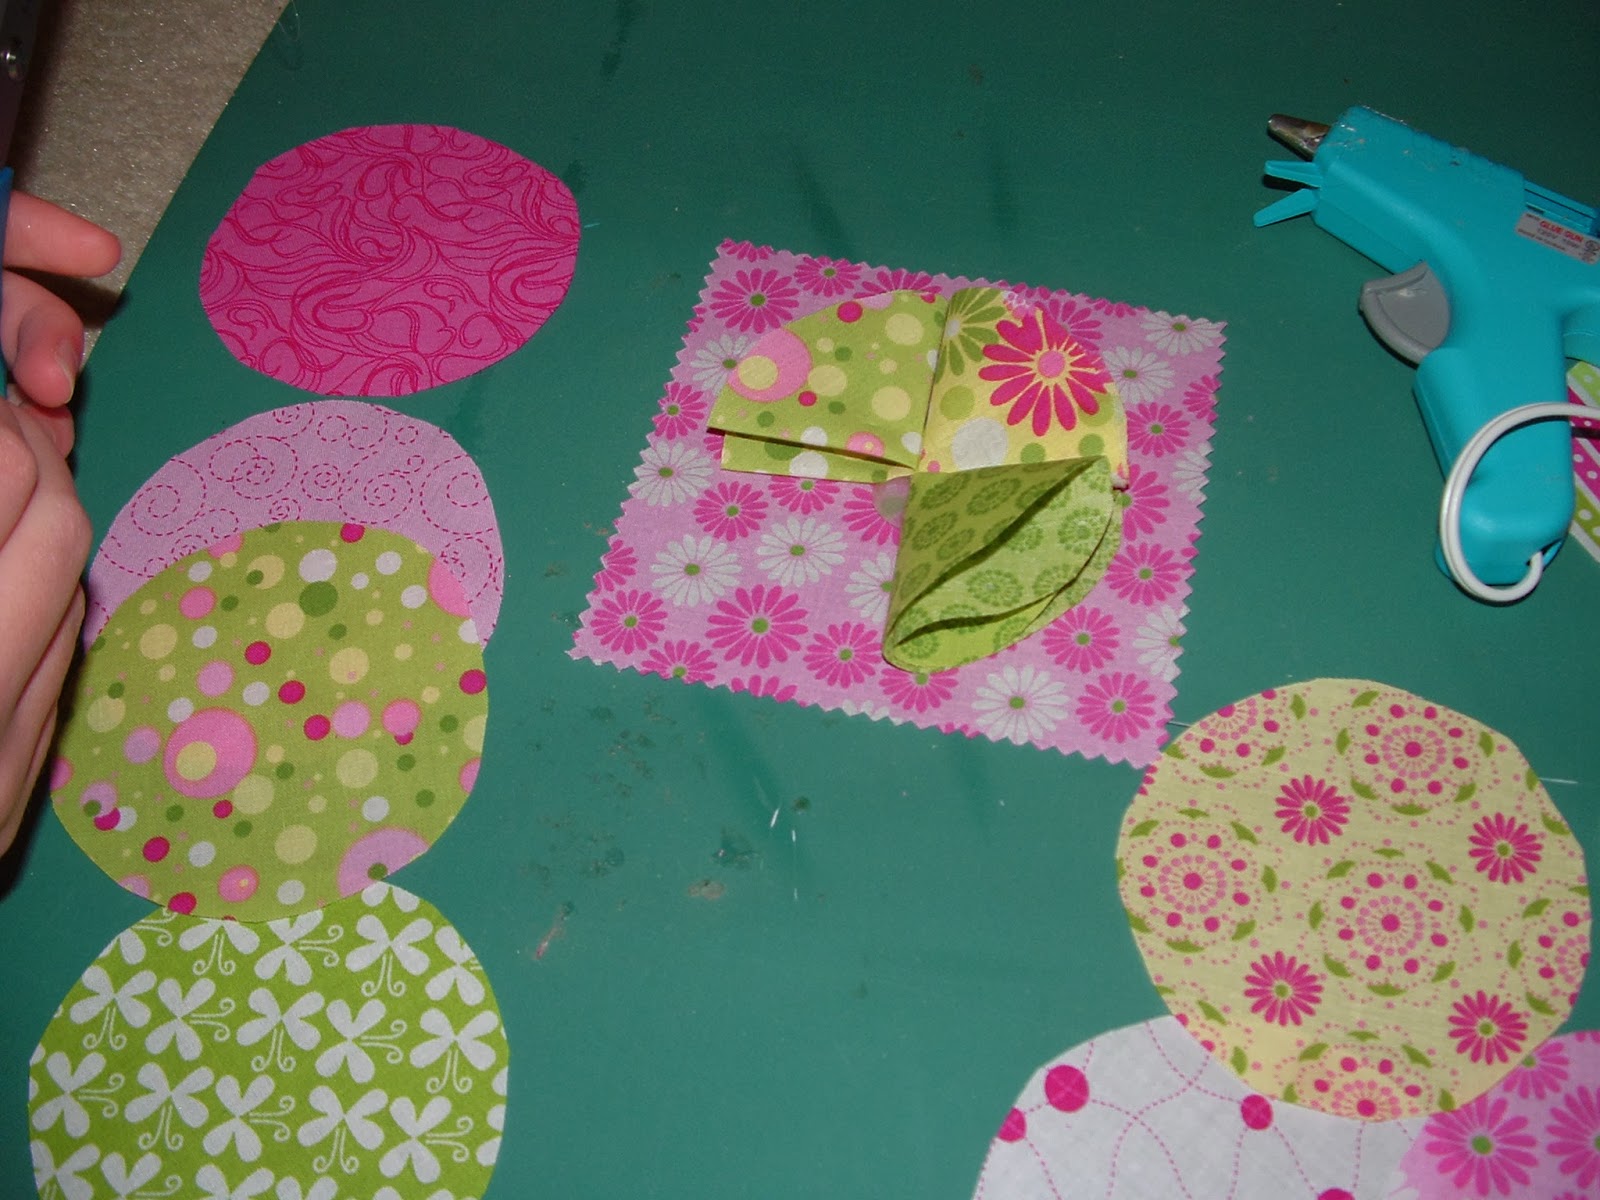
We used squares (they don't look like it in this picture but they are) that were 4" x 4". I personally like flowers from 3x3 squares just as well, maybe better--depends on how you want to use them.
Fold over--you will have a cone shape.
Hard to see here, but put hot glue on your base. About a nickel to quarter size will do it.
Place the tip of your cone into the top left corner of the glue.
Fold another circle and place the tip of the cone into the top right quadrant of your glue. The tips of the cones should be touching.
Third cone in the bottom right quandrant--tip touching the tips of other cones.
Fourth cone into glue. Press the cones to make sure they are firmly in the glue.
In the center of the bottom layer, put another nickel to quarter size "blob" of glue.
Now you are ready for your second layer of circles. Fold as before, and place first one in the middle of the first two you placed on the bottom layer. You want it to be between (and on top of) the first two. Now do just as you did on the first layer--by quadrants. After your second layer, you are ready for the third. As before, put glue on second layer and place between (on top of) the quadrants.
Glue a button or anything decorative that will define your center. You may want to "fluff" your petals a little. Cut away your base by cutting around the circle and you'll have this:
You can use different fabrics or circles out of the same fabric. Because they are folded, you'll still get
a unique look. These are so fun to use in decorating. Wreaths, bows, anywhere you want to put them.
Thanks to a friend, Danielle, from my church for teaching me, and my youngest daughter who made this one while I took pictures. I hope you can figure this out. After you do a couple, you find they are really quite easy. Send me some pictures of yours--I'd love to see how you use them.
Last week I promised you a tutorial on how to make fabric flowers. Lots of pictures, but if you are
like me, I need step by step directions. You probably could do it without my micro managing
steps but I didn't want to leave anything out and wanted to try to make it easy for you.
This wreath has fabric flowers that we made.
We used squares (they don't look like it in this picture but they are) that were 4" x 4". I personally like flowers from 3x3 squares just as well, maybe better--depends on how you want to use them.
Out of the squares we leave one as a square to be the base and cut the others into circles. They don't have to be perfect. You will need 12 circles.
Fold the circle in two. Fold over--you will have a cone shape.
Hard to see here, but put hot glue on your base. About a nickel to quarter size will do it.
Place the tip of your cone into the top left corner of the glue.
Fold another circle and place the tip of the cone into the top right quadrant of your glue. The tips of the cones should be touching.
Third cone in the bottom right quandrant--tip touching the tips of other cones.
Fourth cone into glue. Press the cones to make sure they are firmly in the glue.
In the center of the bottom layer, put another nickel to quarter size "blob" of glue.
Now you are ready for your second layer of circles. Fold as before, and place first one in the middle of the first two you placed on the bottom layer. You want it to be between (and on top of) the first two. Now do just as you did on the first layer--by quadrants. After your second layer, you are ready for the third. As before, put glue on second layer and place between (on top of) the quadrants.
Glue a button or anything decorative that will define your center. You may want to "fluff" your petals a little. Cut away your base by cutting around the circle and you'll have this:
You can use different fabrics or circles out of the same fabric. Because they are folded, you'll still get
a unique look. These are so fun to use in decorating. Wreaths, bows, anywhere you want to put them.
Thanks to a friend, Danielle, from my church for teaching me, and my youngest daughter who made this one while I took pictures. I hope you can figure this out. After you do a couple, you find they are really quite easy. Send me some pictures of yours--I'd love to see how you use them.
Labels:
crafts,
decorating,
homemaking
Friday, January 3, 2014
Getting there...gonna change the color!
Happy Friday! The weekend is here. I'm looking forward to a normal week next week. With
holidays in the middle of the week it seems to confuse my simple mind. It feels like we just had
a weekend with New Year's Eve and New Year's Day and now it's Friday...again. I like routine--how about you?
The desk is coming along, in case there were one or two of you who were wondering. I figured out this morning what it was that I wasn't pleased with--it's not the bright white I had envisioned in my mind. When my sweet husband went to buy the paint, they were out of "Pure White" and they told him
NOBODY buys Pure White, so I probably really wanted "Old White". Which is what he got after asking me. This morning I called and they have received 8 quarts of Pure White, so apparently
SOMEBODY buys it or they wouldn't have ordered it. I'm thinking they probably just wanted a sale since they were out of my preferred color. Anyway, their little ploy worked because I'm going to get a quart of Pure White (when my budget allows) and finish my project. No work on it today because my girls and I spent lunchtime and the afternoon out shopping and having fun.
So obviously, the Old White will be the primer--expensive primer :(.
Here is another display from the store. The stack boxes on the left were featured
here. If you want a closer look, just click on 'here'. They're decorative and make good storage if you're like me and sometimes need somewhere to store, hmm....junk. :)
Next week, I'll have a couple of tutorials on fun things to make.
And just to end our visits this week, I'll leave you with some birdie happiness. Have a great weekend, and visit with you on Monday.
holidays in the middle of the week it seems to confuse my simple mind. It feels like we just had
a weekend with New Year's Eve and New Year's Day and now it's Friday...again. I like routine--how about you?
The desk is coming along, in case there were one or two of you who were wondering. I figured out this morning what it was that I wasn't pleased with--it's not the bright white I had envisioned in my mind. When my sweet husband went to buy the paint, they were out of "Pure White" and they told him
NOBODY buys Pure White, so I probably really wanted "Old White". Which is what he got after asking me. This morning I called and they have received 8 quarts of Pure White, so apparently
SOMEBODY buys it or they wouldn't have ordered it. I'm thinking they probably just wanted a sale since they were out of my preferred color. Anyway, their little ploy worked because I'm going to get a quart of Pure White (when my budget allows) and finish my project. No work on it today because my girls and I spent lunchtime and the afternoon out shopping and having fun.
Here is another display from the store. The stack boxes on the left were featured
here. If you want a closer look, just click on 'here'. They're decorative and make good storage if you're like me and sometimes need somewhere to store, hmm....junk. :)
Next week, I'll have a couple of tutorials on fun things to make.
And just to end our visits this week, I'll leave you with some birdie happiness. Have a great weekend, and visit with you on Monday.
Subscribe to:
Posts (Atom)